Primeiramente vamos instalar o Docker, seguindo o link da instalação oficial:
Siga as instruções no link abaixo:
https://docs.docker.com/docker-for-mac/install/
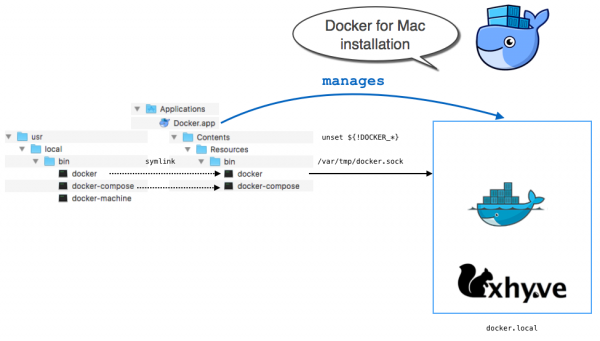
Após a instalação essa será a estrutura do Docker no seu Mac.

Obs: Docker para Mac não usa VirtualBox, mas HyperKit, uma solução MacOS de virtualização leve construída sobre o Hypervisor.framework do macOS 10.10 Yosemite ou maior.
Checando as versões do Docker Engine, Compose, e Machine
|
|
$ docker --version Docker version 17.03.0-ce, build 60ccb22 $ docker-compose --version docker-compose version 1.11.2, build dfed245 $ docker-machine --version docker-machine version 0.10.0, build 76ed2a6 |
Alguns comandos úteis para testar se está tudo ok com a instalação do Docker:
1 2 3 4 5 6 7 8 9 10 11 12 13 14 15 16 17 18 |
$ docker version Client: Version: 17.06.1-ce API version: 1.30 Go version: go1.8.3 Git commit: 874a737 Built: Thu Aug 17 22:53:38 2017 OS/Arch: darwin/amd64 Server: Version: 17.06.1-ce API version: 1.30 (minimum version 1.12) Go version: go1.8.3 Git commit: 874a737 Built: Thu Aug 17 22:54:55 2017 OS/Arch: linux/amd64 Experimental: true |
|
|
$ docker ps CONTAINER ID IMAGE COMMAND CREATED STATUS PORTS NAMES |
Para ver se o docker está buscando corretamente as imagens no repositório remoto:
1 2 3 4 5 6 7 8 9 10 11 12 13 14 15 16 17 18 |
$ docker run hello-world Unable to find image 'hello-world:latest' locally latest: Pulling from library/hello-world b04784fba78d: Pull complete Digest: sha256:f3b3b28a45160805bb16542c9531888519430e9e6d6ffc09d72261b0d26ff74f Status: Downloaded newer image for hello-world:latest Hello from Docker! This message shows that your installation appears to be working correctly. To generate this message, Docker took the following steps: 1. The Docker client contacted the Docker daemon. 2. The Docker daemon pulled the "hello-world" image from the Docker Hub. 3. The Docker daemon created a new container from that image which runs the executable that produces the output you are currently reading. 4. The Docker daemon streamed that output to the Docker client, which sent it to your terminal. |
Finalmente vamos instalar o elasticsearch, para isso utilizaremos o docker pull para buscar nossa imagem do elasticsearch no repositório oficial do docker.
|
|
$ docker pull docker.elastic.co/elasticsearch/elasticsearch:6.5.3 |
Para ver as imagens baixadas pelo docker e disponíveis para uso, use o comando:
|
|
$ docker images REPOSITORY TAG IMAGE ID CREATED SIZE docker.elastic.co/elasticsearch/elasticsearch 6.5.3 ca27036dd5e7 2 weeks ago 510MB hello-world latest 1815c82652c0 2 months ago 1.84kB |
Rodando agora a versão de desenvolvimento:
|
|
$ docker run -p 9200:9200 \ -e "http.host=0.0.0.0" \ -e "transport.host=127.0.0.1" \ docker.elastic.co/elasticsearch/elasticsearch:6.5.3 |
Para ver se está tudo OK digite:
|
|
$ curl -u elastic:changeme -XGET http://localhost:9200 { "name" : "0Cu7DlH", "cluster_name" : "docker-cluster", "cluster_uuid" : "BeKjKtjgTeCwONBMpniAhA", "version" : { "number" : "5.5.2", "build_hash" : "b2f0c09", "build_date" : "2017-08-14T12:33:14.154Z", "build_snapshot" : false, "lucene_version" : "6.6.0" }, "tagline" : "You Know, for Search" } |
Observe as credenciais -u elastic:changeme acima, elas são padrão na extensão de segurança X-Pack Security que vem dentro na imagem do elasticsearch.
A autenticação pode ser desabilitada passando xpack.security.enabled=false como opção no comando do docker, ficando assim:
|
|
$ docker run -p 9200:9200 \ -e "http.host=0.0.0.0" \ -e "transport.host=127.0.0.1" \ -e "xpack.security.enabled=false" \ docker.elastic.co/elasticsearch/elasticsearch:6.5.3 |
Agora é possível utilizar desta forma, sem autenticação:
|
|
$ curl -XGET http://localhost:9200 |
E como eu não quero ter que lembrar a todo momento esse comando gigante, vamos dar um nome para ele e assim podermos subir a nosso docker de elasticsearch mais facilmente.
|
|
$ docker run -p 9200:9200 \ -e "http.host=0.0.0.0" \ -e "transport.host=127.0.0.1" \ -e "xpack.security.enabled=false" \ -e "cluster.name=es-cluster-1" \ --name elasticsearch \ docker.elastic.co/elasticsearch/elasticsearch:6.5.3 |
Assim é possível rodar apenas digitando:
|
|
$ docker start -a elasticsearch |
Finalmente vamos adicionar dados ao nosso ElasticSearch:
Primeiro precisamos adicionar um indice (um indice é um conjunto de documentos):
|
|
$ curl -XPUT http://localhost:9200/blabla {"acknowledged":true,"shards_acknowledged":true} |
Agora digite:
|
|
$ curl -XGET http://localhost:9200/_cat/indices |
e você verá o índice que foi criado:
|
|
$ yellow open blabla sQ_i6I5MTxWuDj1jQUuwwA 5 1 0 0 324b 324b |
com o índice criado, vamos criar um documento qualquer:
|
|
curl -XPUT http://localhost:9200/blabla/joke/1 -d \ '{ "title": "Once Upon A Time", "author": "Unknown", "about": "Suspension of desbelief" }' |
Você deve ver:
|
|
{ "_index": "blabla", "_type": "joke", "_id": "1", "_version": 1, "_shards": { "total": 2, "successful": 2, "failed": 0 }, "created": true } |
Obtendo o documento criado acima:
|
|
$ curl -XGET http://localhost:9200/blabla/joke/1?pretty { "_index" : "blabla", "_type" : "joke", "_id" : "1", "_version" : 4, "found" : true, "_source" : { "title" : "Once Upon A Time", "author" : "Unknown", "about" : "Suspension of desbelief" } } |
Obtendo um documento que não existe:
|
|
$ curl -XGET http://localhost:9200/blabla/joke/2?pretty { "_index" : "blabla", "_type" : "joke", "_id" : "2", "found" : false } |
Removendo um documento:
|
|
$ curl -XDELETE http://localhost:9200/blabla/joke/1?pretty { "found" : true, "_index" : "blabla", "_type" : "joke", "_id" : "1", "_version" : 5, "result" : "deleted", "_shards" : { "total" : 2, "successful" : 1, "failed" : 0 } } |
Bons estudos 
Links relacionados:
https://docs.docker.com/docker-for-mac/install/
https://docs.docker.com/docker-for-mac/#check-versions-of-docker-engine-compose-and-machine
http://blog.ryanjhouston.com/2017/04/10/elasicsearch-docker-containers.html
https://www.elastic.co/guide/en/elasticsearch/reference/5.5/docker.html#docker-cli-run-prod-mode
https://marekj.github.io/2016/03/22/elasticsearch-mac-osx
![]()
